I wanted to go through some basic terminology, which will help you to understand the slides we're going to see. This is a typical section through the project. It is a mixed face tunnel, which means partially in earth and partially in rock, the earth portion is supported by means of various methods of support of excavation. We have already covered that material. On this project, the earth portion was typically supported by soldier piles and lagging or secant pile walls. That upper portion was braced by pipe struts or rock anchors, or some combination of those two.
Much of that material has been covered and you will see applications of it again on this project. The lower portion was in rock, and the rock was removed by drilling and blasting. Whenever you see a typical section like this, the rock is shown to be removed as if by magic, with some kind of a laser. It's removed exactly sufficient to construct your structure inside. I must say, I made this drawing myself and I repeated that same peculiar notion that you can sculpt the rock excavation to fit your structure perfectly.
 Of course, in reality, it's nothing like that. The rock is removed by a drilling and blasting. Naturally, that's done with great care and great control. You certainly want to minimize the amount of rock excavation, because it's very costly. At the same time, if you don't over excavate, you will find tight spots, which means you have to return and somehow chip out those tight spots to provide enough space for your structure.
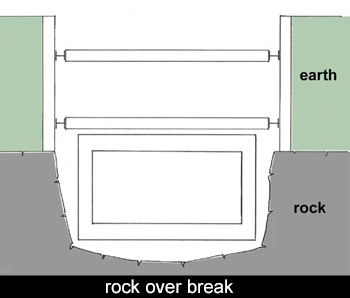
I've drawn a typical section, which is a lot closer to reality and shows the rock over excavated. You also have to be extremely careful that you don't over excavate to the point where it may undermine the support of the earth layer above the rock. Very difficult to control exactly how the rock is going to split. There are procedures of line drilling, pre-splitting to ensure that you do not undermine the earth layer above the rock.
In general, you will get a picture that looks much more like this, as opposed to that theoretical look that you'll see in textbooks. How do you accommodate this area, which has been over excavated? We have already seen an illustration in the video of a mud slab. After you have completed your excavation, you pour the mud slab. The mud slab is always an event to be celebrated, because it means you have gotten all the way down to the bottom of the hole.
You've overcome many problems and encountered many surprises on the way down, but you've managed to solve all of those - and only after you've solved them can you pour the mud slab. The mud slab is a good time to take a deep breath, pat yourself on the back, because you've accomplished the most difficult challenges of the project. Very often the structure you're going to build is a simple concrete box and that becomes, really, the easiest part of the project. Although the design documents focus very much on the finished structure, they are a relatively silent on all of the construction issues.
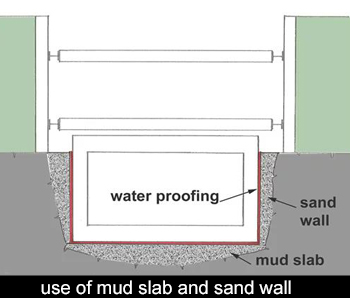 To fill out that over excavated rock area, you begin with a mud slab and that evens out the bottom and allows you to continue the construction on a solid surface. You must also even out the walls and that is done with a sand wall. Sand wall is also a concrete wall. You have to put up a single face form, and you fill that space with concrete. Typically, you apply the waterproofing over the mud slab and the sand wall. Then, you're ready to construct the new structure.
continue > >