The footing has been completed, and we're ready to continue with the construction of the abutment walls. The formwork will be a two-faced form. That is to say, you have access to both sides of the wall. You erect formwork on both sides of the wall. You join the forms together with a series of tie rods. The tie rods carry the hydrostatic head of the concrete, which is considerable.
 Here are the form panels that will be used to form the abutment wall. These are reusable systems. They're very economical and efficient. They come right from the factory. You can purchase them, or you can rent them. They include all of the necessary hardware for joining the form work together. There are situations where you custom make each form, but otherwise, this reusable system, or similar systems, are the way to go. The threaded portions are usually this very coarse thread. You don't want a fine machine thread, because it will quickly get covered with debris and will be unusable.
These are anchor slots. They are attached to the forms, and we'll leave a roof in the finished concrete. The groove is used to anchor brick facing, or a stone veneer to the concrete surface. Here you can see the formwork assembled using their hardware devices and various whalers to join them into large panels. This is a completed set up. It looks like it's ready for concrete. You can see all of the elements there are in place, including these inclined braces, which are attached to the concrete footing. This is a very nice arrangement, a wide walkway for the workers. Very good-looking set up.
Here, you can see some of the elements, or the form ties. These are actually sleeves that go around the form tie. After the forms are stripped. You can actually slide out the form tie and reuse it. These are the form ties themselves, together with the hardware that's attached to the end. Again, this is an effective system, because you reuse these ties over and over again. Of course, you've now left this hole in the concrete, which needs to be patched.
This is my nice fine art video shot of a lather wiring the vertical rebar together for the wall. Right alongside of him, you can see a series of panels that will form the wall. This is called a back face. It is the first formwork that goes up. You erect that. You brace that. You plumb that. You get it exactly where it belongs. Then, that becomes a guide for the lather to install the rebar. That's the process that's going on here.
This is the opposite side of that form. The back form goes up first, then the rebar. The rebar itself goes up in two stages - first, the back face of the rebar and now this lather is placing the bars in the front face of the rebar. He's wiring them together. He has a little spool of tie wire and he wires the rods together.
This appears to be a sleeve for a drain. You don't want the water to collect behind the abutment. That would increase the pressure on the abutment. Periodically you would introduce these drains, or weep holes, to make sure that no water collects it behind the wall. Here's another view of the back face of the form that goes up first. And the last it was installing the rebar. This is the tie rod that goes through from the front face to the back face. These pieces of hardware are simply joining the front face panels together to form a large unit. You can distinguish them. You can see the, where the rods are extended, that's the tie rod that goes through and through.
At the bottom of the form that the protruding tie rod is protected with a little plastic cap. You always want to make sure there are no projections from the formwork, or no projections of any sort, which could injure a worker. They are covered with a plastic cap here.
That is very important. This carpenter is actually in between the rebar, and he's installing a bulkhead form. What we've been looking at is the backface form and the frontface form, but at the end of the pour, you have to close off that space with what we call a bulkhead. That has to be a handmade form, custom-made to fit in this space. It has to have holes drilled in it to allow the rebar to go through. It needs to have a groove cut in it. If there's water stop that has to be installed. That's a very time-consuming and expensive piece of formwork to both build and to remove. These devices are chairs or spaces to provide the correct cover over the rebar. If you want 2 inches of concrete cover, we need to install these two inch chairs to make sure you get that cover.
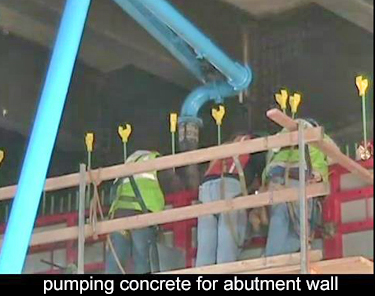 This view the wall is being poured. Again, you see these yellow caps over the projected rods as a safety measure. You can see how effective the concrete pumping is in delivering the concrete exactly where it's needed underneath the bridge. This would be a real challenge if it weren't for tools such as the concrete pump. Traditionally, before concrete pumps were in wide use, you would have to lift the concrete in a bucket, and the crane would have to carry it up to the top of the worrk. In this low headroom condition, that would be just about impossible.
Here's a concrete truck discharging into the pump. What's unusual here is that the pump is being protected by this sheet of plastic. I guess it's a brand-new pump, and they're trying to keep it looking new, but it seems to me that's pretty much a lost cause.