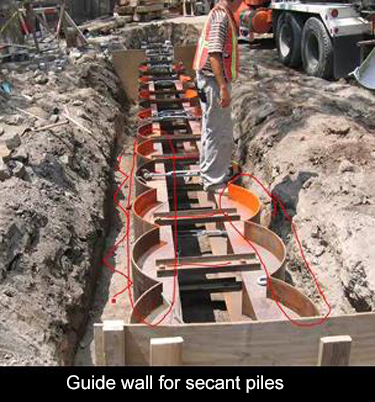
This video shows us the installation of the secondary hole. To begin with, the casing is outfitted with these cutting teeth, because it needs to cut into the two adjoining primary holes. The teeth get worn out and need to be replaced. This auger bit is also armored with additional cutting surfaces and cutting teeth, because it too has to cut through the adjoining concrete. This is quite different from the bucket that was used in the primary hole, which just removed soft material.
Here the drill rig has engaged the casing and the casing is being rotated to cut its way through the two adjoining shafts of concrete. The auger has gone down in the hole. It appears to be making its final pass, just prior to filling the casing with concrete.
 The auger has come up with this odd-looking mixture, which is ground up concrete, plus whatever native soil remained in the casing. On the left, the foreman is checking the depth to make sure he's down where he wants to be. Looks like he still wants a little more cleaning out to be done.
At first, I couldn't figure out what was happening here. He's drilling the auger into the soft ground. I couldn't imagine what that was about until, finally, he came and disconnected the auger. This is just a very simple way of getting the auger out of the way. He just buries it in the ground temporarily. And because it's in its upright position, he can come right back and reconnect.
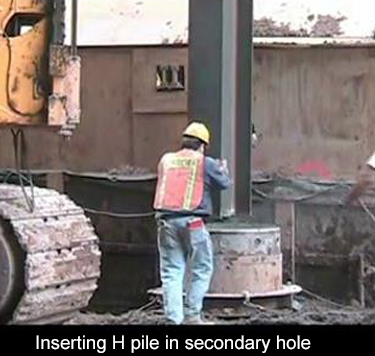 The secondary hole requires an H pile inserted in it and that's what really gives the wall its strength. An unreinforced concrete wall might be water tight, but really would not have adequate capacity in bending. That capacity comes from the H piles, which go into every other hole.
The rig you see is doing all the work. It has two small jibs on the top. One is handling the drill, and the other has picked up the H pile. The rig has such a low center of gravity that it can can actually walk with these two loads hanging from it. There are horizontal bars that are welded on the H piles to keep it more or less centered in the casing.
This is a clever move, the H pile is hanging from a shackle, but it would be very difficult to unhook it once it was set down in the hole. It comes to rest temporarily on a horizontal rod and the shackle is now disconnected. The load is now being carried by that bar. Now, the H-pile is being transferred to a quick release shackle.
You wouldn't want to handle the pile using this quick release shackle. But once it's down in the hole and it cannot come loose, then it's perfectly safe to transfer the load onto this device. That's what they're doing here. Now they're able to lower it all the way in the hole.
He pulls a cord and the jaws come open and the quick release shackle is withdrawn. Now the H pile is in place. The concrete truck is right there. You don't want to waste any time. You want to begin filling this with concrete as soon as possible to keep material from infiltrating at the bottom of the casing.
This was a very interesting touch. The foreman has called the rig to come back and he's going to seat the h-pile. He's using thr rig as a ram, and he's tapping on the H-pile to make sure it's seated.
They are placing a hopper in the casing. You want the concrete to come down in the center of the casing, otherwise it's going to push that H pile to one side or the other. This way, the flow of concrete is coming down the center and is distributed evenly over the H pile.