We have made many references to drilled in piles, sometimes called mini piles. I don't know if I ever showed you the machine that actually installs the piles. This is a typical setup to install the drilled in pile. The work is being done at night. For this particular project, they are going to drill through the overburden and then drill through the roof of the subway tunnel, and then through the invert of the subway tunnel, and continue down to bedrock. Because they're penetrating the subway tunnel, obviously, the tunnel needs to be taken out of service. That can typically be done during evening hours. That's why this rig is shown here working at night.
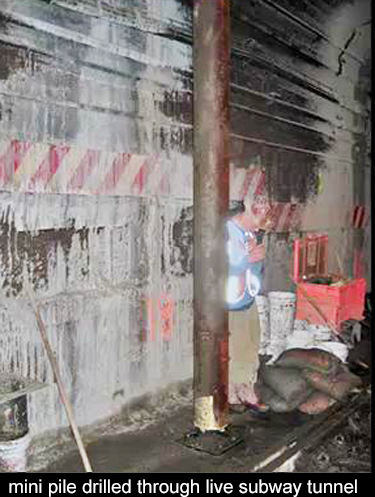 Here's a view inside the tunnel. The drilled in pile has already penetrated the roof of the tunnel, and you can see this has to be done with great care. There are utilities on the wall of the tunnel, probably on the roof as well. The pile has advanced through the open space in the tunnel and it's ready to penetrate the invert and continue down to rock. I'm not sure if you can make it out on your screen, but there's a little gasket at the foot of the pile. This tunnel is slightly below the water table and, after you penetrate it, there could be some seepage into the tunnel. A gasket has been provided here to minimize that seepage.
The pile will be progressed through the invert and then onward into the bedrock. After the pile is seated in bedrock, it would have to be cut flush with the invert, because you could not leave the pipe in this configuration. It would be too close to the train. You would have to complete a pile before you restored the train traffic - or you could uncouple the pipe and return the next evening and re-couple it and continue.
There probably is an option to drill these mini-piles just outside the wall of the tunnel. We don't have enough information to know why it was installed inside the tunnel. By having it inside, you could simplify the procedure for re-supporting the track on top of the mini-piles. That could have been their goal here. With the mini-pile located outside the tunnel, the final operation of re-supporting the track, would have required a different kind of structure.
Probably, more labor and larger pieces would have been involved. I'm sure this was taken into consideration and the decision was made to come up with a system that allowed for the efficient installation of the mini-piles through the tunnel. The mini-piles, located near the center of the tunnel, would always have to be done through the tunnel space. I believe they just focused on procedures that would allow them to do that with the good rate of production. They simply apply those procedures to all of the mini-piles.
Here's another shot of a similar rig working on a different project. I've included this to show you that this rig is very versatile. You can use mini-piles for many applications. In this instance, they are being used to support a new bridge pier. The reason they elected mini-piles is that they are being installed underneath the existing bridge. There would not be enough headroom to drive conventional piles. Because this rig takes up less headroom and is installed in shorter lengths, you can see the operator as handling a piece, which looks like it might be about 10-feet long. This kind of a machine can work in a low headroom condition and still produce piles of any length that you need.
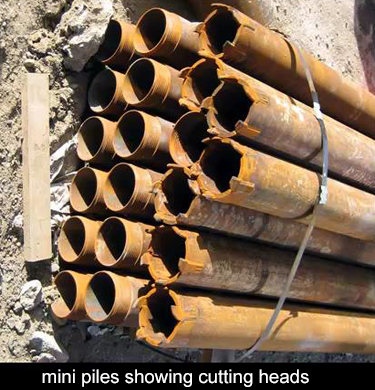 Here are the two configurations of the pipe wall of the pile. On the right hand side, you can see that the pipe has been fitted with some cutting teeth - and that would allow it to cut through obstructions to cut through the roof and the invert of the subway tunnel, and also to seat the pile in bedrock. Typically, the pipe sections have threaded ends, such as the sections on the left of the photo, and they simply screw one into the other and can make up a pile of any length.
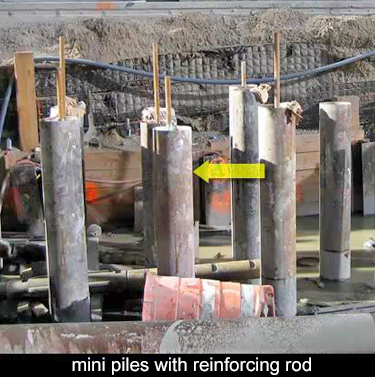 Here's a view of a group of completed piles. In the background, you can see the supportive excavation is soldier piles and lagging. Just above it, some geotextile fabric, holding up some freshly placed embankment. The completed pile consists of this pipe casing. There is a high-strength rod in the center of it and then the space is filled with grout, which is pumped in.
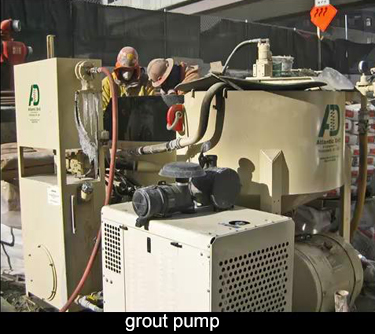 Here is the rig which mixes the grout and pumps it into the pile. You need to pump it in, qe've discussed this before, If there is water inside the pipe. You cannot place concrete or grout through the water. The safest way to do this operation is to pump it. You take the discharge end of the pump line. You place it down at the bottom of the drilled in pile and then you pump the grout, and the grout will displace any water that's standing inside the pipe.