In this project, the fill is constructed using lightweight material. This is special material, which weighs, perhaps, as little as one half of the weight of normal soil. On this site, there is a compressible layer of soil and if you added a 6-foot overburden, you would get significant settlement of that compressible layer. You overcome this by adding lightweight fill instead of normal weight fill. That in itself would add a 6-foot overburden, or be it half the weight of a normal overburden. It still would produce unacceptable results.
So the solution was to excavate a quantity of the existing material and replace it with lightweight fill, and then place lightweight fill above it to reach the final grade. You're sort of lightening the load to begin with, and then replacing it all to obtain a net zero effect. That is to say, there is no additional load per square foot on that compressible material. I believe lightweight fill also has applications as backfill behind retaining walls to reduce the load on the walls. There is a widespread use for lightweight fill.
Now, the area has been brought up to grade with the lightweight fill, as I've been saying, and it has also been topped off with sub-base. The sub base on this project consists of a 12-inch layer of granular material. It has been placed here and rolled and compacted. It looks like it's just about ready for the formwork. While we're here, I want to point out how the work zone is completely secured, completely isolated from the public.
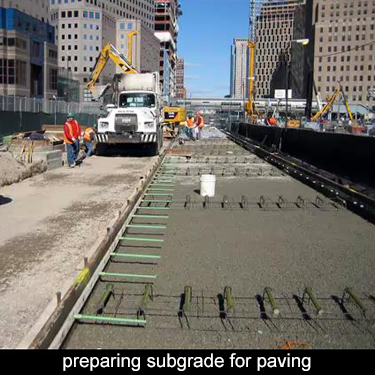 I just want to move from left to right and describe what's going on. This fellow is walking on the sub base. The sub base is 12 inches of granular material compacted and fine graded to exactly the correct grade. When that's in the right place, the roadway forms are placed. They're usually metal forms, and they're held in place with steel pins.
When that 4 inch layer is in place, you can attach these dowels. You attach them with couplings and that will allow you to couple them to the adjoining slab. Then, at frequent intervals, I would guess the intervals are about 12 or 15 feet, you install these cradles of rebar. These are set at the location of construction joints. The construction joint is sawcut in later. There were many, many formed joints tried over the years. They all had some defect and the latest method, the most successful method, is to pave through these bundles of rebar and then come back and sawcut over them to create a joint. That's what's being done here.
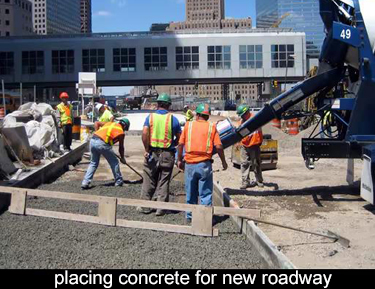 Finally, you place an 11-inch layer of concrete. Now, this system is called a 50-year pavement, or sometimes it's called a European pavement. It certainly seems very robust. I imagine the term 50-year is justified. This is the process used here. This is a New York State DOT process. It may be totally different where you are. Of course, everything you do has to conform to your local requirements.
Here are the components of this pavement. There's a 12-inch underlying subbase, and there's 4 inches of fine aggregate, plus only enough cement to get it to hold together. It remains very porous and that is exactly the intent. And there is an 11 inch concrete slab. This slab is unreinforced. You can see here the female ends of the dowels. You will insert a male dowel and that will join the two slabs together. The top surface is roughened with tines to give it this longitudinal scratched effect. That produces what we call a 50-year pavement.
continue >