Here's a general view. You can see, where the workers are standing, two lanes have been completed. This would be two lanes of the permanent roadway. As you come closer to the camera, there's another full lane over here. This is a kind of a partial lane. You really don't want to pour little tapered shapes. You don't want to pour a lane that's less than the full width, because in the finished product, the motorist tends to see the seam lines between the lanes. And that's what really guides him.
Sometimes that is more obvious and easier to read than the painted stripes. You don't want to create a lot of shapes which are different than the travel lane. There's an area here which has been left out. There's a recess in the pavement on this project that marks the location of a crosswalk. There'll be a pedestrian crossing at this point. The pavement is treated differently. There could be granite stone laid in this area to differentiate it from the rest of the pavement. In this project, there's colored concrete that's going he placed in the walkways.
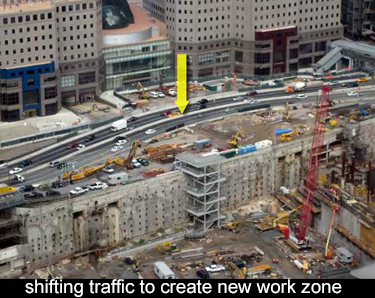
Two lanes are all you could fit in this space, but when you want to shift traffic, you will need three lanes. The area where the dynahoe is, is being leveled off and that will be covered with asphalt. When you're ready to open this to traffic, you will have to full lanes, which are the permanent lanes and one temporary lane, which is going to be asphalt. Similarly you would have to place some asphalt in this area to create the full three lanes that you need.
 In this view, traffic has been shifted. Beginning on the right, this is the area which was offset. All the traffic was pushed as far to the West as possible. Now, it's being redirected onto the permanent pavement, where you could place permanent pavement. That's supplemented by temporary pavement, where you needed the full three lane width.
That slice is now placed in service and that immediately allows you to create a new work zone, which is a new narrow strip. You will now repeat the same process of placing as many lanes of permanent pavement as you can. You can see the edge of the GRES wall, how it's supporting the raised embankment here. It's a sharp drop off, but it's very easily supported by the GRES wall, a very inexpensive, quick way to achieve that retaining wall.
I wanted to compare the starting slide with the final slide. We've been able to construct the first elements of new pavement in this area and then supplement it with temporary asphalt, where we had to. In that same general area, there was a new sewer that had to go in. All of those activities have to take place - the utilities, including the sewer, and placing new pavement, plus temporary pavement.
Finally, in the bottom slide, that was open to traffic. As you can see, the duration is a little less than 5 months, which I think is excellent progress given these long narrow shapes. You have to remember, it's very hard to access them. You're working in long slivers. You're backing the equipment in and out for the full length of these long narrow slivers. You cannot get the normal production that you're used to getting. I think they really completed quite a bit in being able to accomplish this first shift of traffic in less than five months
With the traffic shift in place, all the traffic now is over here on the left of the photo. You're now able to establish a new work zone. The machine on the right is breaking the concrete so that the slabs can be lifted out and loaded off. Then you're pretty much repeating the same cycle of doing all of the utilities, followed by the pavement, which will be followed by still another traffic shift. That's the way you have to execute a project of this sort. You need these long, narrow work zones, which are difficult to access. You need to be prepared for less productivity, higher unit prices. That's the unavoidable consequence of working in this kind of a crowded narrow setting.
Here's a close up of the GRES wall. You can also see the edge of the pavement, all of the features there, the popcorn concrete layer above it There's a little piece of black tape here. The construction joint is created by sawcutting the pavement and I think I'll have slides of that later on in these presentations. That creates a controlled crack right over that bundle of dowels and that is the construction joint. That needs to be promptly filled in with some joint sealer. This piece of tape on the end is just containing that joint sealer.