We're going to go through some of the typical means and methods for constructing the new bridge. Here, you can see the columns have been removed. The load has been re-supported on these temporary towers. The space between the towers is the site of the new abutment. The soil conditions in this area are excellent, so the abutment is going to be constructed on a spread footing. The video will show you some of those details.
Here, you see the needle beams in place. The existing column has been removed, and the footing for the new abutment is now under construction. The formwork for the footing consists of these panels. The panels are erected and joined together. There's bracing to keep them plumb and to keep them from shifting. In this view, the bottom mat of the reinforcing steel has been installed. That first layer of rebar is referred to as the bottom mat. The second layer will be referred to as the top mat.
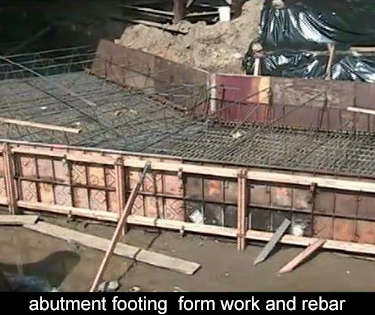 There are two styles of rebar. The green is epoxy coated. It probably will go up into the wall, where it's exposed to the elements - and the uncoated the bar will probably go into the footing where it's buried and somewhat protected from the elements. The forms are held together by means of tie rods. That's a very effective way of containing the hydrostatic head of the concrete. Those pressures are very high, and these tie rods carry the tension is a very effective way of containing that pressure. It's also necessary to brace the formwork because the entire set of forms may shift because of unequal distribution of the concrete. These are very carefully braced and tied together. Both systems are used to secure the forms.
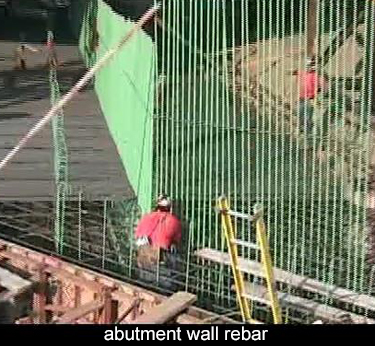 Now, we've advanced, and the lathers are installing the top mat of rebar. The trade is called lathers. They are not iron workers, but a very specific trade used to install the rebar. Now, you can see the shape of the new abutment is becoming apparent. In this view, you can see the top mat of the rebar, and also the vertical steel, which will form the abutment.
The lather here has some drawings in his pouch. The rebar is very carefully detailed on shop drawings. If you're not familiar with the term shop drawings, those are the drawings that are made to provide details for every element of the construction. The contract drawings are the initial documents and from them shop drawings are made to expand on the details and provide specific information for fabricating rebar, in this case - or the structural steel, or any of the elements that are required in the permanent structure.
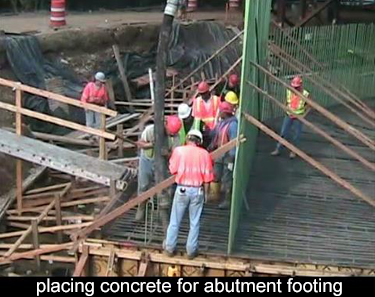 Here, you can see the difference. The uncoated rebar is in the footing and the green epoxy rebar is in the wall. Now, concrete is being placed in the footing. It's being pumped and you can see how easy it is for one man to manipulate that discharge and place the concrete exactly where he wants it to be. You can see he's beginning here in a corner, which is fine, but that puts all the hydrostatic load on that corner. The entire formwork would want to shift with if it was not adequately braced. Here's the lineup of equipment - a concrete pump and some trucks queuing up to discharge into the pump.
You need to strike a balance. You want to have ample supply of concrete ready to go. At the same time, you don't want the concrete waiting too long on the job site. This needs to be carefully orchestrated. Here, the inspector is getting wheelbarrow. She's going to get a sample of concrete and perform a slump test. We're not going to go into that in any great detail, because that was covered in an earlier class; but measuring the slump is a very effective indicator of how good the concrete is going to behave and what strength you will ultimately expect from this product. This is very good field control for the quality of the concrete. It should be regular a part of the inspection process.