Now we're back at the site. This building rests on caissons, and you can see some of the activities here this caisson appears to be completed.
These are some of the drilling tools. Here is another completed caisson. This jig is very interesting. When the caisson is down to rock, you need to insert the steel column. The top of the column has to be set at precisely the correct location and elevation. The way you do this is by creating this little table, which you can adjust to height to line and to grade. That will hold the steel column in place while you are concreting.
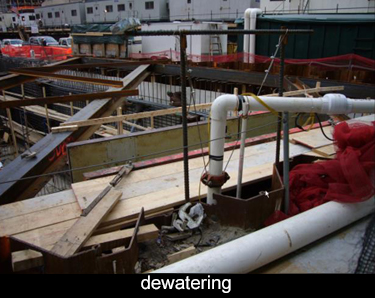
Now we're somewhat more advanced. You can see the elements here. The perimeter is ringed by steel sheet piling. These vertical pipes are for the dewatering system. The way you advance the excavation here is a method called inclined rakers. The soil is left in place to support the steel sheet piling. And the excavation proceeds in the center. Here you see the foundation slab being constructed. The steel sheet piling can cantilever to a certain extent, but enough material has to remain to support the steel sheet piling.
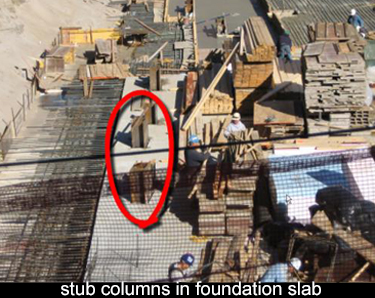 Here, some of the foundation slab has been poured. I want to note these short stubs, which are projecting from it. They will be used as a reaction block for the incline rakers. That permits you to continue excavating down.
This is a good view of the inclined raker, which bears against these short columns. when they are in place, you can excavate between the rakers. After you install the incline raker, you can excavate to this point, which is the top of the foundation slab. At that time, you can install this horizontal brace. With the horizontal brace in place, you can continue further down to the subgrade.
This is a good view showing each of the elements. Here's the steel sheet piling. The pipe that's resting on top of it is the discharge from the dewatering system. Here is a horizontal whaler installed near the top of the steel sheet piling. That whaler is supported by these inclined rakers, which bear against short column stubs cast into the floor slab.
 When you install the inclined raker, you can excavate further down to allow you to install this horizontal brace. When the horizontal braces in place, you can then excavate further down to the subgrade and pour the foundation slab. You can see each of these elements here when the foundation slab is in place, you can then remove the horizontal brace. Of course, you want to remove it because it's going to be in the way of constructing the foundation wall. Here is the caisson.
 When you reach the corner of the excavation, it's no longer necessary to install the incline rakers. You can use diagonal bracing at the corners. That's what's being done here. You also get a good view here of the caisson in the foundation wall.
I'd like to review some of the details here. Of course, the first element that goes in is the steel sheet piling. Then, the white piping is associated with the dewatering system. In this case, it's a deep well system. That system is capable of lowering the groundwater significantly. It moves a tremendous volume of water in front of the steel sheet. Barling is the back form for the foundation wall. It's located some distance away from the sheet piling. As I said before, this is a configuration that I think is desirable. In front of the back form is the front form. That defines the foundation wall. That space will be filled with rebar and concrete. When the forms are stripped away, you can actually enter the space between the back of the foundation wall and the steel sheet piling and you can apply your waterproofing. That, in my experience, is the most positive and desirable waterproofing application.
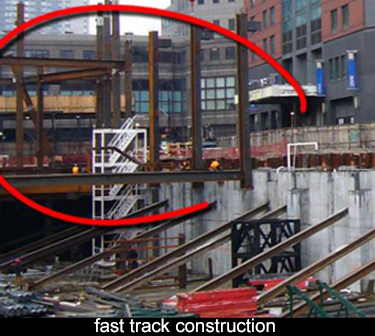 This is a good view of the foundation wall. The incline rakers are still in place, and they penetrate the foundation wall. Of course, they must remain in place. They are supporting the steel sheet piling wall, They will continue to carry the load of the wall until the foundation is complete and the floor slabs are poured. Then, and only then, is the foundation wall competent to receive the load. These rakers will remain in place for some time. When they are finally removed, there's a waterproofing challenge to make a tight seal in the space where they penetrated the foundation wall. In the background, you can see the beginning of the steel erection. This defines fast-track construction. You do not wait for the foundation wall to be 100% complete. As soon as enough of it is complete. You begin the steel erection.