This is a video showing the installation of one of the primary holes. The machine is now lowering a bucket into the casing. The casing has already been established. It is driven to some partial depth, and the bucket is going in the hole to clean it out. This kind of a bucket is designed to just clean out fairly soft material from within the casing.
You can see the operator moving the controls. It's a complicated machine. It goes up. It goes down. It rotates clockwise. It rotates counterclockwise, there's a lot going on and the operator certainly has to spend some time getting familiar with the machine. The bucket is moving pretty easily through the material, because this is just removing the native soil, which in this case is pretty soft.
He's lifting up the bucket, which is filled with material, and now he's engaging the casing. He's going to drive the casing further down. It's a simultaneous operation. You advance the casing, then you clean out the casing then you advance it some more. The bucket has a trap door on the bottom of it, so he lowers this outer ring, and he engages the bucket somehow and trips that door. You can see the material is quite soft.
The drill is in a very busy street, and it's an ongoing cleanup challenge. He cannot allow the material to pile up. This loader is stationed there on a continuous basis. Trucks have to be available so that you can keep removing that muck.
Now he has the casing down almost to the bottom. I think at this point, that bucket comes up pretty much empty. The operator on the left is checking the depth of the hole. When he opens the bucket, I think it's more water than any solids.
At this point, he's closing that trapdoor. He's set aside the bucket, and now they're preparing to fill the shaft with concrete. They're installing this ring. It's really a clamp. As they place concrete, they're going to withdraw the casing, and you don't want the casing to slip back down in the hole. This serves as a clamp to prevent the casing from sliding back into the hole.
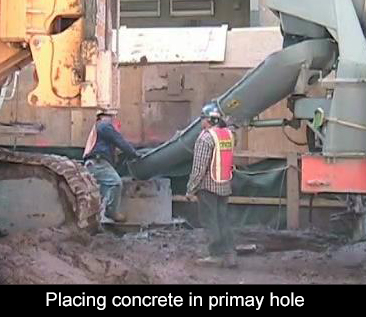 Now we're ready to concrete the casing. Looks like they're ready to begin placing concrete. They don't waste any time, because the bottom of the hole can start filling up with water or some other fine material. You really want to get the concrete in there as soon as you can. This concrete truck must have been standing by ready to go.
They've now placed some amount of concrete, and they predetermined this. How much concrete does it take in order to allow them to lift out one section of casing? This has been calculated. Now they know exactly what it takes to free up one length of casing. That's what they're engaged in now. They're going to clamp onto this casing and lift out a section.
Well, now you've seen the sequence of events, the process for creating a drilled shaft. In this case, the drilled shafts will be joined together to form a continuous secant pile wall. But there are other applications for drilled shafts and for caissons. This is typical of the techniques that are used.