Whenever you are constructing a new structure and your excavation passes close to some existing building or some existing foundation, you need to consider underpinning that existing foundation. You cannot afford any settlement or movement of the adjoining structure. By underpinning, you create some means of re-supporting the adjoining building and carrying the loads down below the limit of your new excavation.
Even if you're using the most advanced techniques for supporting excavation, which are secant pile walls and slurry walls, there is still a risk of some loss of material and that can certainly jeopardize the adjoining structures. A positive means of underpinning those structures must be considered. There are no hard rules. Each situation has to be reviewed. What are the nature of the loads? Are they concentrated loads? Are they spread loads? What is the nature of the soil? All of these factors have to be taken into account. Ultimately, if there's any risk of movement to the adjoining structure, you need to underpin that structure.
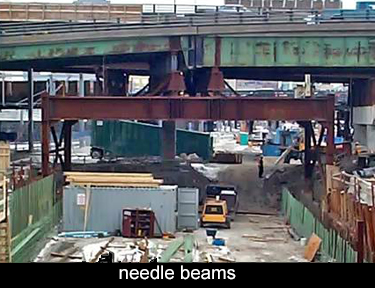 One of the simplest forms of underpinning a concentrated load is the use of needle beams. In its simplest form, a beam is placed on either side of a column. The column is attached to the beam and, when the beam is fully supported at some safe distance beyond the excavation, then that column can be removed. Those beams are called needle beams. This is a very classical approach to accommodating a concentrated load.
In this illustration, there is an existing elevated highway, that green structure, you can see the traffic on it. One of the columns, or perhaps some more than one of the columns, lies right in the path of the new excavation. There's no evaluation that has to be done here. That column must be removed. It's done by creating two temporary supports and then spanning them with a needle beam. The load then gets transferred onto the needle beam and then it's safe to remove that column.
When I say transferring the load, it's absolutely essential that whatever temporary structure you create, it needs to be pre-loaded before the load can be transferred. In this illustration, that needle beam is fairly long, and it's going to deflect a measurable amount. That would mean the existing structure will settle by that amount. That is unacceptable. Your goal is to make sure that no movement takes place in the existing structure.
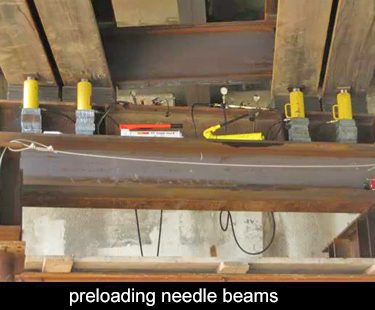 You do that by introducing the loads, usually by hydraulic jacks, until the beam is preloaded and the beam is pre deflected - then you can transfer the loads. It's important to note that the pre-loading also pre-loads your temporary supports and the footings that they rest on, there may be some compression or settlement that takes place under the footings. You want all of those movements to be done to come out of your structure before you transfer the load.
I wanted to close in on some of the details here. The typical case, and you'll run into it very often, is the need for a needle beam on either side of a column. You pre-load the needle beam and you remove the column. Here, you can see the loading is much more complex. The elevated highway is at two different elevations. An intermediate system of beams was used. Those are the beams that are running into the photograph. Here are some posts that are used to also make up for the difference in elevation. It's not clear how this was pre loaded, but hydraulic jacks are used to pre-deflect all of these members. The resulting space is shimmed out with very fine shims and then the load may be safely transferred.
 This is an existing bridge which is going to be replaced. It is the subject of our final class in the infrastructure series. In many existing bridges, the structural steel is found to be satisfactory and only the concrete deck is replaced. In this structure, it was deemed necessary to replace the entire structure. The traditional approach is to do that one half at a time. You squeeze all the traffic onto one half of the bridge, while you remove and replace the other half of the bridge. On this site, they elected a different approach.
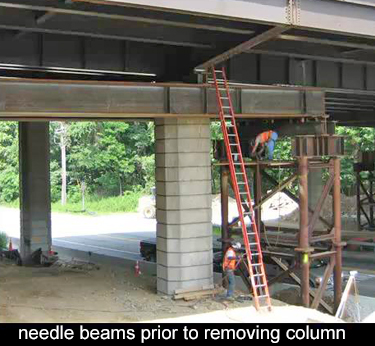
They wanted to get a head start on building the new foundation, the new abutment and its footings, while the bridge remained in service. That was an interesting approach. It would minimize the impact on the traffic; shorten the time that they would be affected by the new construction. To do that It was necessary to remove the existing column, shown here on the right, that was in the way of the new abutment structure. That was going to be done with this very traditional needle beam approach. This crane, which is a low overhead crane, has taken hold of this beam, and it's going to raise it on the two temporary towers.
Here, the needle beam is in place, one on either side of the column. That's the traditional look. There are actually two on either side of the column, but it's hard to make that out in this view. You can just barely make out a hydraulic jack placed on that shorter beam, which provides room for the jack and makes it simpler to transfer the loads.
Here's a good view of the jacking arrangement. There is a hydraulic jack provided under each of the needle beams. In this view, of course, you can see clearly that there are four needle beams. The jacks are sitting on this lower beam. That provides enough headroom for the jacks. They're shimmed up to fill out that space and you're now ready to introduce the load onto the needle beam.
What is somewhat unusual here is that a hand pump is being used to jack up this load. This is a significant load. If you've ever tried to do this kind of work, it takes quite an effort to build up the pressure that you need in each of these jacks. I guess the more typical approach would be to hook up all four jacks to one manifold and operate it by means of a mechanical pump. In that instance, you just have to throw the switch and the mechanical pump does all of the work.
Of course, a pump of that sort probably requires a pump operator. In the interest of economy, this contractor decided to do this by hand. He did join the jacks in pairs. If you had four individual jacks, you get all this differential movement, which you don't want. He has controlled that by hooking up each of the jacks as a pair, so that they would operate simultaneously. Doing it by hand produces exactly the same result. You're not sacrificing anything, but this will certainly take more time and involve a lot of human energy.