Here's the finishing machine. You can see that screw, which is distributing the concrete - leveling off the concrete. Behind it, there's a smooth cylinder which is striking off the concrete and smoothing it. Out of sight, behind the cylinder, there's usually a drag which is drawn over the concrete to give it a rough texture. You don't want a completely smooth finish. Even if you're going to sawcut it later, you still want to roughen the Initial concrete. The concrete pump is distributing the concrete. The man with the rake is taking away some of the excess concrete. Of course, the concrete is also being vibrated. So there's very little manpower required here. Most of the people here are just observing.
When the finishing machine reaches the end, the machine will advance by about 6 inches or so and then make a backward pass over the concrete, and the process just continues like this.
Here's an overall view of the bridge. The bridge deck is complete, but there's still a great deal of work after the completion of the bridge deck. The approach roadways have to be constructed. All of the ancillary activities, curbs, guardrail, bridge, rail. All of that takes a good deal of time, but in this photo, those operations are more or less complete. They're very close to shifting the traffic.

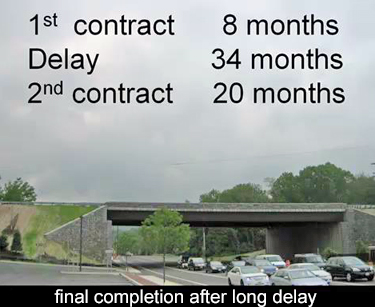
Here’s the completed bridge. They certainly invested a good deal of time and effort and expense in considering the appearance of the bridge. The wing walls are faced in granite, which is a really excellent treatment. But the bridge, because it's a very long span, and the girders are very deep; It has a kind of a heavy overbearing look to it. Even the parapet, which is a faced in granite, sort of contributes to this heavy look.

The original bridge had railing, and you could look through the railing and see daylight through the railing. At least by eye, this bridge seems to be sagging, and that's a that's an unfortunate way to leave the finished bridge. I have no idea how the cambers were calculated, but you want to over camber, if anything, so that after the dead load deflections take place, you're still left with some positive camber. You really need to avoid any kind of negative camber. I think this bridge exhibits that.
To go over some of the time frames, the first contract took about eight months. There was more time involved, because there were some initial utility work, which I did not observe. There was at least eight months of structural work. Then the project was shut down. They anticipated about a five-year delay. They actually improved on that because there was some federal stimulus money available. Since the project was shovel-ready, they were able to award a second contract earlier than they imagined. The second contract had a 20 month duration. That concludes the two classes on removing and replacing an overpass.